Conditions and Interactions
The basic principle of Logia/Practice Editor is as follows: each experience is divided into "Steps," which can be seen as the different stages of the procedure you wish to simulate. To move from one Step to another, conditions must be met by the user (e.g., perform an action, move an object, etc.). Logia/Practice Editor provides you with a wide list of conditions that allow you to replicate many processes.
The conditions are therefore applied to:
- An object (which must be moved, rotated, etc., to fulfill the condition)
- A Step (to define the criteria for moving to the next Node)
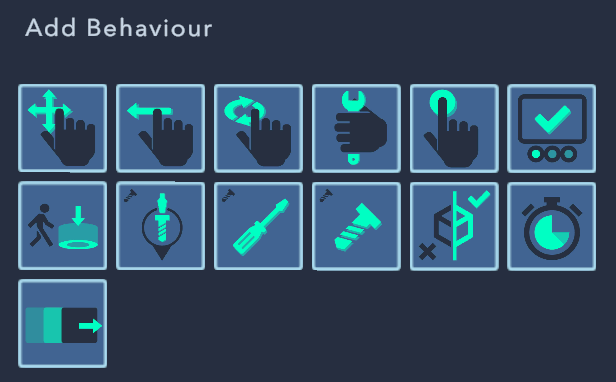
You will find the condition parameters in the inspector, and you will also see the small icon of the selected condition under the condition group column of your Step in the Step flow.
Reminder: Clicking on an icon of a behavior allows you to assign a behavior to an object.
! WARNING ! Not all behaviors are conditions; some behaviors are essentially options applied to the object for the selected step!
Basic Conditions
By adding a condition in the inspector, you will populate the currently selected Condition Group. Once the experience is launched, the user must fulfill the Conditions to proceed to the Node connected to the Condition Group's output. You can add multiple conditions to a Node; to move to the next Node, all conditions must be met, without any specific order.
Move
Add a "Move" condition. This condition requires that the object with this condition be placed on the corresponding “Move Target.” The "Move Target" is a duplicate of the object, generated when this condition is added. It should be positioned where the user is expected to place the object as part of the ongoing experience. Once this condition is applied, the object can be freely moved by the user, and the condition will be validated when the object is placed on the target.
After adding the condition to an object, the following section appears in the inspector when the object is selected. In addition to specifying the position of the "Move Target," this section allows you to define several options.
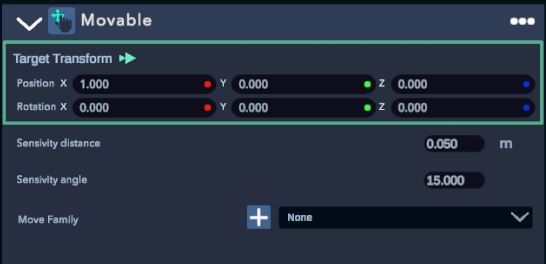
Only position : Indicates that only the position will be taken into account.
Sensitivity distance: Indicates the minimum distance the object must be from the "Move Target" to validate the objective.
Sensitivity angle: Indicates the allowed margin of error for rotation (only if Only Position is not checked).
Move Family: Indicates whether the target can be activated by other objects with the "Move" component. If the family is anything other than “None,” it means the target can be activated by any other object with the same family. A possible use case is placing multiple identical objects on multiple identical "Move Targets" interchangeably.
Rotate
Add a "Rotate" condition. This condition requires that the object with this component be aligned with the corresponding “Rotate Target.” The "Rotate Target" is generated similarly to the "Move Target." Once this condition is applied, the object can be freely rotated (but not moved) by the user, and the condition will be validated when the object is aligned with the target.
After adding the condition to an object, the following section appears in the inspector when the object is selected.
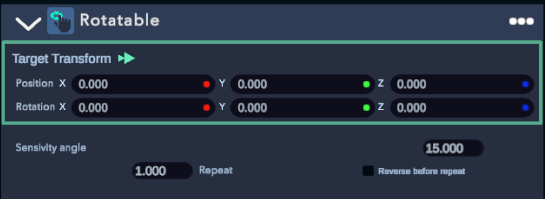
Sensitivity angle: Indicates the allowed margin of error for the rotation.
Repeat: Specifies that the rotation must be repeated the number of times indicated in the text box. If "Reverse before repeat" is not checked, the rotations are additive: the object will not return to its initial position after each rotation.
Reverse before repeat: (Requires a Repeat value > 1): Resets the object to its initial position after each rotation.
Slide
Add a "Slide" condition. The functionalities are identical to the "Move" condition, but the object can only move in the direction of its Target or in the opposite direction. Once this condition is applied, the object can be moved along a fixed axis, and the condition will be validated when the object is placed on the target.
After adding the condition to an object, the following section appears in the inspector when the object is selected.
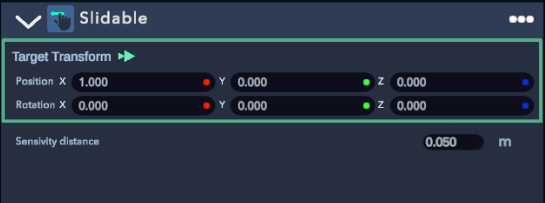
Sensitivity distance: Indicates the distance the object must be from the target to validate the condition.
Touch
Add a "Touch" condition. This condition will activate if the object is touched.
After adding the condition to an object, the following section appears in the inspector when the object is selected.
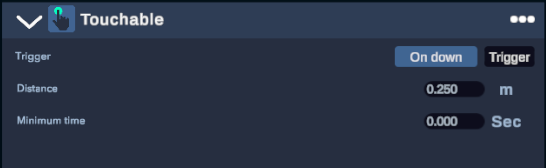
Trigger: Indicates whether the user must also press the trigger on their controller when their hand is in contact with the object to validate the condition.
Minimum time: Indicates the required contact time to validate the condition.
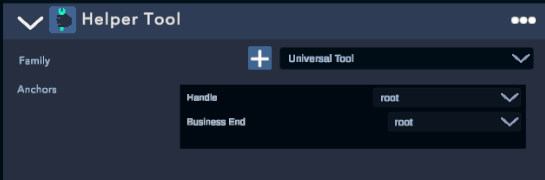
Helper Tool
Add a "Debug" condition. This condition will be implemented in a future update.
Unit Applicator
The Unit Applicator module is used to simulate the application or cleaning of fluid substances.
It consists of a set of 3 types of objects that have a relationship within a group called “(Unit) Family.” In this Family, there is an Applicator Tool that applies a “Sub Family” to an Applicator Target. You can change the “Sub Family” that the Applicator Tool will distribute via an Applicator Dispenser, which will dispense a type of “sub family.”
Examples
Peinture: (Unit) Family Pinceau avec peinture rouge: Applicator Tool = Pinceau avec Sub Family = rouge Pot de peinture bleue: Applicator Dispenser = Pot avec Sub Family = bleu Mur à peindre en rouge: Applicator Target = Mur attendant une Sub Family = rouge Peinture bleue: Sub Family = bleu Absence de peinture: Sub Family = vide *Peinture rouge: Sub Family = rouge
other examples
*Screws: (Unit) Family
*Screwdriver without screw at the tip: Applicator Tool = Screwdriver with Sub Family = empty
*Bag of size 12 screws: Applicator Dispenser = Bag with Sub Family = size 12
*Location to screw in size 12 screws: Applicator Target = Location waiting for a Sub Family = size 12
*Size 12 screw: Sub Family = size 12
*No screw: Sub Family = empty
For the condition to be valid, at least one Applicator Tool and one Applicator Target must have the same subFamily relationship (the ApplicatorTool must have the subFamily expected by the ApplicatorTarget).
Applicator Tool
This is the tool intended to apply the substance.
After adding the condition to an object, the following section appears in the inspector when the object is selected:
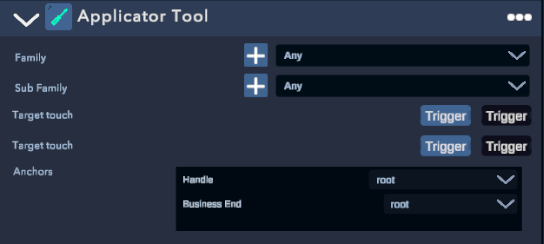
Family: (the Unit) Family. All Applicator Dispenser and Applicator Target that will interact with this Applicator Tool must have the same Family. Ex. : Paint
Sub Family: Sub-family indicating the "state" carried by the Applicator Tool at the beginning of the step. If it matches the sub Family expected by the Target, the target will be validated. The possible Sub Families are shared among all elements of the same Family. Ex. : Blue paint
The Applicator Tool can change its SubFamily via an Applicator Dispenser (Ex: Brush starting without paint and then dipping into a bucket of blue paint)
Target Touch (x2): This option will be implemented in a future update.
Anchors: Anchor points. These elements must be defined in the Object Editor or are already defined for default importable objects in the hierarchy. For the Applicator Tool, two anchor points must be defined:
*Handle: Defines the area that can be grabbed by the user's hands (i.e., the handle of the tool).
*Business End: The part that must touch the Target to apply the Sub Family (i.e., the bristles of the brush).
Applicator Dispenser
It is an object capable of changing the Sub Family applied to a Tool (like a paint pot allows changing the color of the paint associated with a brush). The Applicator Tool must have the same Family as the Dispenser to interact with it.
After adding the condition to an object, the following section appears in the inspector when the object is selected.
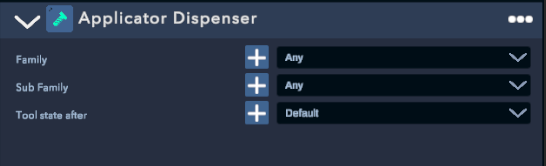
Family: (the Unit) Family. All Applicator Tools that will interact with this Applicator Dispenser must have the same Family.
Sub Family: Indicates which Sub Family will be applied to the Applicator Tool if it comes into contact with it.
Tool state after: This option will be implemented in a future update.
Applicator Target
It is the surface on which the substance must be applied. This surface can be divided into several pieces, or Sub Targets (to model the case where a large surface cannot be covered all at once by the Tool).
After adding the condition to an object, the following section appears in the inspector when the object is selected.
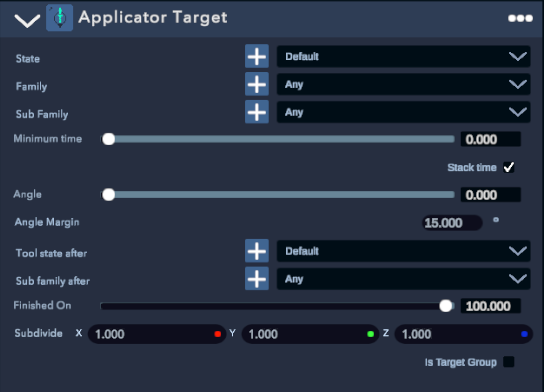
Family: (the Unit) Family. All Applicator Tools that will interact with this Applicator Target must have the same Family.
Sub Family: Sub-family that the Applicator Tool must have in order to interact with this Target.
Minimum time: Time in seconds during which the Applicator must touch this target to validate it. (Ex: screwing for 1 second).
Stack time: Does the time during which the target is touched (Minimum time) by the Applicator Tool accumulate between the entries and exits of the Applicator Tool? (Ex: If the Tool must remain in contact with the Target for 5 seconds, checking this box allows the user to apply the tool for 3 seconds, remove it, then reapply it for 2 seconds).
Angle: Angle at which the Applicator Tool must touch the Target to validate the condition.
Custom Float: Allowed margin of error for the angle in degrees.
Tool State After: This option will be implemented in a future update.
Sub Family After: Sub Family that will be applied to the Applicator Tool after completing a Sub Target (Ex: no paint on the brush after applying blue paint).
Finished on: All: all Sub Targets must be validated to validate the Condition.
Percentage: 70% of the Sub Targets must be completed.
Subdivise: Allows defining the name of Sub Targets. For example, X=10, Y=1, Z=10 allows you to break the original Target into 100 Sub-Targets. If a value is ‘0’, it will automatically be treated as ‘1’.
Is Target Group: The children of this Applicator Target will be considered as targets to be filled (ex: Screw placement). It has the same effect if you apply an Applicator Target to multiple objects separately.
Smart Board
The Smart Board is a panel that allows simulating abstract actions or actions that are too complex to simulate in 3D. This object can be considered as a questionnaire.
After adding the condition to an object, a "Smart Board Item" is associated with the object.
In VR, the Smart Board item will appear with a title/Question (Question). A list of possible answers will be offered, each with a name (Item Name). When an answer is selected, a loading process will occur (Item Duration). A reaction to this answer will then be shown to the user (Item Answer).
The following section appears in the inspector when the object is selected.
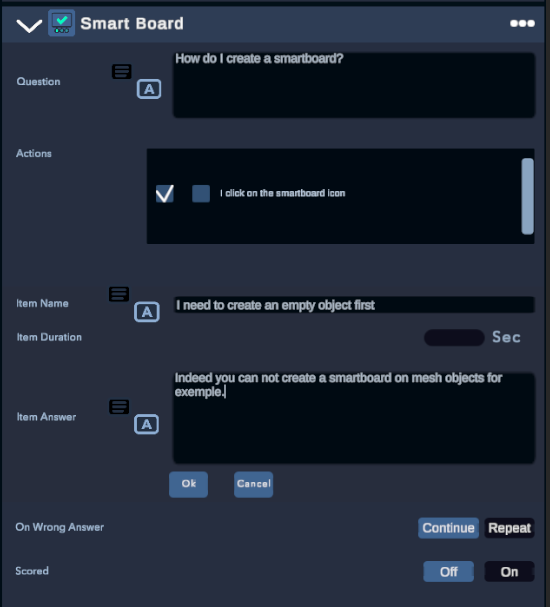
Question: The title/question that will be shown to the user.
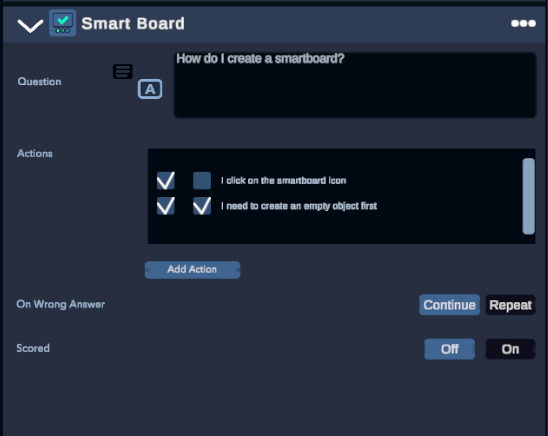
Actions: List of actions/answers existing in the experience. They are shared with all Smart Board Items. (In the example, there is only one). The marker to the left of the question indicates whether the option will be present on the current Smart Board Item. The marker to the right indicates if the answer is considered correct. At least one option must be correct and present to avoid blocking the user in the experience. By clicking on "Add Action," a new creation block appears.
Item Name: Name of the option.
Item Duration: Loading time between the validation of the option and the display of the reaction.
Item Answer: Reaction to the answer. It can represent, for example, an explanation if the answer is wrong or a message of congratulations. By pressing "ok," you will add the option to the list and also add it to the current Smart Board Item (the marker on the right will be checked).
On wrong: Continue will validate the Condition even if the wrong answer is chosen. Repeat will prompt the user to answer again and choose an option.
Scored: Indicates if this SmartBoard will contribute to the “conditional activator” Condition during the experience. (If On Wrong is set to Repeat, the score will be recorded for the first answer given only).
All text boxes available in the Smart Board can be linked to a TextDB.
Teleport
The Teleport Condition forces the user to move to a specific location. When this Condition is added to an object, a marker (“Teleport Target”) indicating the destination of the forced movement will be created and associated with the object.
After adding the condition to an object, the following section appears in the inspector when the object is selected.
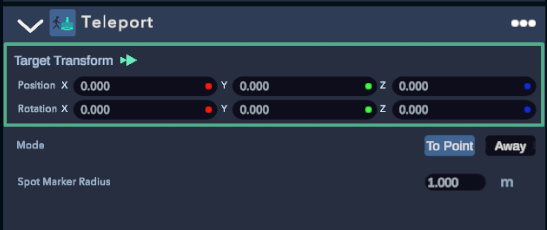
Mode: To Point will ask the user to approach the marker. Away will ask the user to move away from the marker.
Spot Marker Radius: Indicates the distance at which the user must be / move away from the point in meters. It is recommended to allow for a margin of error if the user needs to get closer.
Timer
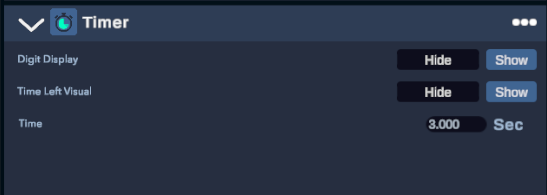
Finish the step at the end of the defined time.
Digit Display: Projects a digital clock with a countdown.
Time Left Visual: Projects a visual clock with a countdown.
Time: Time remaining before the next step.
Sensor
This behavior allows you to select a real item from your VR setup that can activate a condition and move to the next step.
**Sensor selection**: Selects an item from your connected setup that will activate the condition.

Other behaviours:
The behaviors below do not activate any conditions.
They are primarily used to change the state of objects in the selected step.
Conditional Activator
This object allows you to show or hide an object based on the score obtained from all the Smart Board Items encountered so far in the experience that have the "Scored" property.
After adding the condition to an object, the following section appears in the inspector when the object is selected.
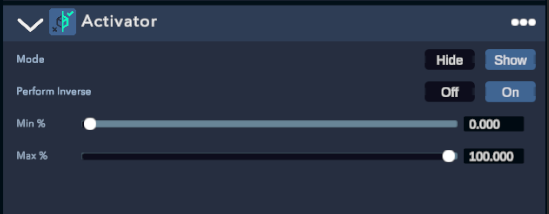
Mode: Hide will hide this object if it meets the score condition. Show will display the object if it meets the score condition.
Perform inverse: The score must be below the required score.
Min%: If the score is above this percentage, the first condition is validated. (If perform inverse is off).
Max%: If the score is below this percentage, the second condition is validated. (If perform inverse is off).
Min and max cannot be the same number, Min cannot be greater than Max, and Max cannot be smaller than Min.
Animate
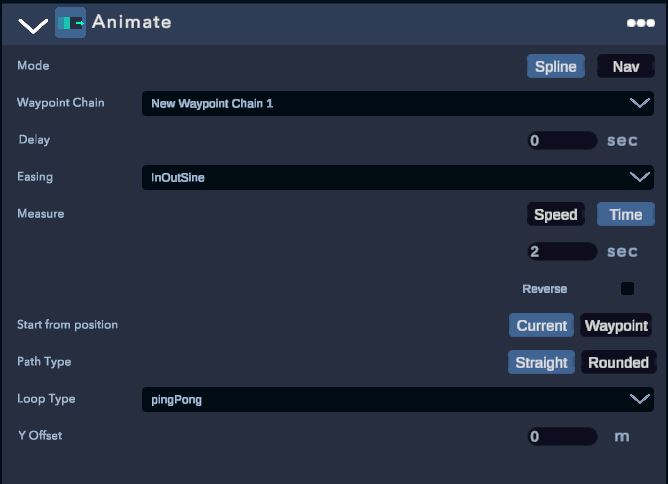
Mode: -Spline: In this mode, objects will follow the waypoint chain.
-Nav: In this mode, objects will follow the waypoint chain as a guide but will move on the ground, avoiding obstacles until reaching the final point.
Waypoint chain: Select the waypoint chain that the object will follow.
Delay: Indicate the desired delay in seconds before the animation starts.
Easing: Choose the type of animation you want.
Measure: -Speed: Choose the speed in m/s at which the object will move.
-Time: Choose the duration of the animation in seconds.
Start from position: -Current: The animation starts from the object's position in the active step.
-Waypoint: The animation starts with the object at the first point of the waypoint chain.
Starting Point: Select which point of the waypoint will be the start of the animation.
Path Type: -Straight: The object follows the waypoint chain exactly.
-Rounded: Curves the waypoint chain to make the animation more "curved" as the object moves from point to point.
Loop Type: Choose whether you want the animation to loop and the type of effect you desire.
Y offset: Allows you to add a height offset for the object's animation.
Actuator
The actuators allow you to change the state of real components in your VR setup, such as the color of your lights.

With the options above, when the trainee reaches this Step, the actuator will change the color of your connected light to green. This can be used, for example, to indicate to the Trainer that they have completed a step successfully.